How to deploy database to Azure using Azure DevOps

Before starting of, I must say there is a lot of ways to do this, depending on the situation and particular context you are in, but here I will be talking about how to deploy database which you have ready in an sql project within solution in Visual Studio. So the journey here is from sql project in the Visual Studio to the actual deployed database running in Azure.
Kind of a typical DevOps task you might say.
In my particular case, I had a couple of C# projects (targeting .NET Core) in a solution also, which are making up an API that I also wanted to include in my pipeline, as well as the above mentioned sql project.
So my idea of how it would look like is something like this:
Restore/Build cs projects –> Run tests –> Build and deploy db project
Very simple. Now, having an API in .NET core I wanted to use a Microsoft-hosted Linux agent. Good thing about these agents is that each time you run a pipeline, new VM is spun up and after pipeline finished executing it’s discarded. You don’t have to worry about configuring it etc. you just choose it and run it.
However, as I found out currently Linux agents cannot build/deploy sql projects. So in order to complete my goal, I had to use two pipelines. First pipeline (Linux Agent) builds the .NET core projects in the solution, runs tests, etc.
The other pipeline, triggered upon successful finish of the first one is running on a Windows agent, it uses MSBuild as a first step to build an sqlproj.
Then copies a dacpac file, which is a product of the database build and describes the database schema so it can be be updated/deployed. After which Azure SQL Dacpac task is run to actually deploy the db to an Azure SQL instance configured from that file created in the first step, and copied in the second.
Before jumping to Azure portal and configuring pipelines, let’s first make sure we have all the preconditions set.
Adjust sql database project settings
First of all, in order to deploy our db to Azure, we have to make sure to choose right target platform for our db.
To do so, go to the properties of your sql project in Visual Studio, and in “Project Settings” tab choose “Microsoft Azure SQL Database”

I mentioned above that sql project, when successfully built produces dacpac file.
What is DAC or dacpac in the first place?
According to Microsoft documentation:
A data-tier application (DAC) is a logical database management entity that defines all SQL Server objects – such as tables, views, and instance objects – associated with a user’s database. It is a self-contained unit of SQL Server database deployment that enables data-tier developers and DBAs to package SQL Server objects into a portable artifact called a DAC package, or .dacpac file.
A DACPAC is a Windows file with a .dacpac extension. The file supports an open format consisting of multiple XML sections representing details of the DACPAC origin, the objects in the database, and other characteristics. An advanced user can unpack the file using the DacUnpack.exe utility that ships with the product to inspect each section more closely
You can found more information about DAC here.
In short this file holds your database schema definition and when used with appropriate tools you can recreate your database from this file on another SQL instance. This file can be generated in multiple ways, you can extract in within SSMS or within Visual Studio, but since we want to include this file in the CI/CD pipeline, we will generate this file when sql project is built.
To do so, go again to Properties of db project, then Build tab, and enter your database name or whatever you like, to the “Build output file name” filed as below:

This name will be used when creating a file with dacpac extension during build. Make a note of it as we will use that in the pipeline.
When we change this properties, you can see in the sqlproj file that these two properties were added:
 <DSP>Microsoft.Data.Tools.Schema.Sql.SqlAzureV12DatabaseSchemaProvider</DSP>

 <SqlTargetName>MyDatabase</SqlTargetName>
Creating build pipeline in Azure DevOps
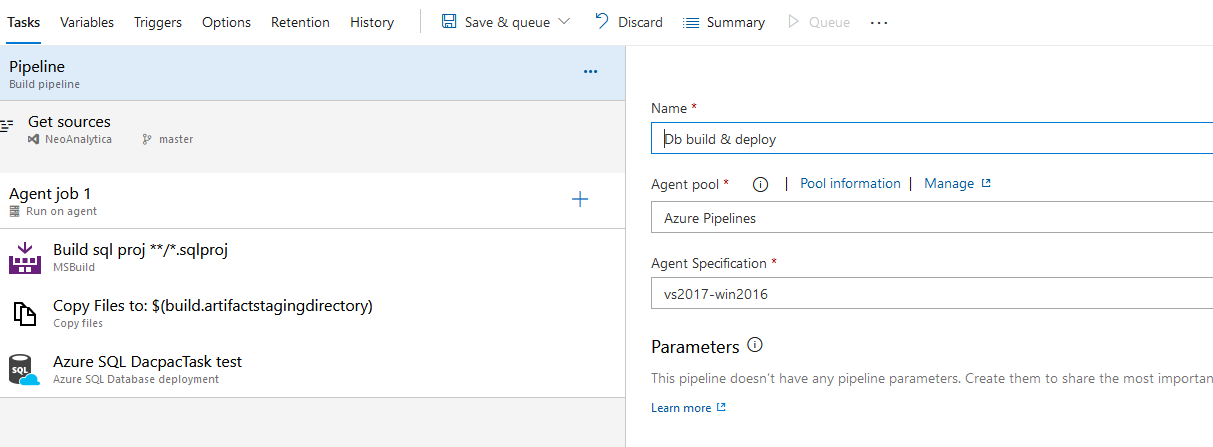
Now we can go on and create a pipeline for building sql project and deploying a database. I mentioned having two pipelines above, since I wanted to have it all connected, but I will just include steps for the second one, as for building a .NET core app/api there is already a predefined template in Azure.

As you can see in the screenshot above, the first step is to call MSBuild to build up our sql project.
The important field is “Project” where we put : **/*.sqlproj so it only looks for sql project and builds those.
Everything else can be left as default, such as MSBuild version and architecture.
The next step, copying files, is to take that .dacpac file generated after MSBuild has completed build for sql project, and copy it to Build.ArtifactStagingDirectory which is a predefined azure variable and it is typical used to publish build artifacts, such as our dacpac file here. You can find more about this and other variables here.

The final step is actual database deployment using Azure SQL DacpacTask.
This step requires you already have Azure SQL server provisioned and according database created.
I am using here SQL Server Authentication but you can use ConnectionString, Active Directory etc.
It is obvious that for Deploy type we should use SQL DACPAC file and in the DACPAC file we should enter the path to our dacpac. Now, since we named our dacpac file MyDatabase, by using path **/MyDatabase.dacpac we will instruct Azure, or rather Azure agent to search through all sub folders and find our file.

And that’s it!
You should be now have fully operational pipeline, that builds your database project and deploys it to Azure.
When choosing a first cosplay outfit, it is worth considering how details related to Halloween styling will affect the complete look. As fans study the source material, reviewing details related to cosplay costumes also makes comfort and movement easier to judge. To organise preparations involving details related to character costumes, cosplay wigs with comfortable materials can help narrow the options for a specific purpose. To stay comfortable throughout the event, it is useful to check details related to beginner costume choices against the wearer's own needs.