Azure Load Balancing Solutions - Lab 1 Azure Load Balancer
Learn about Azure Load Balancer with follow along lab.


What is load balancing?
When diving into cloud services, I’ve found that theory alone can only take you so far. While it’s important to build a solid foundation of concepts, things often remain abstract until you apply them to real-world scenarios. Azure offers several load balancing solutions—many of which sound similar and serve overlapping purposes. Without seeing them in action or understanding the specific use cases, it's easy to get stuck in a loop of confusion, unsure of when to choose one over the other.
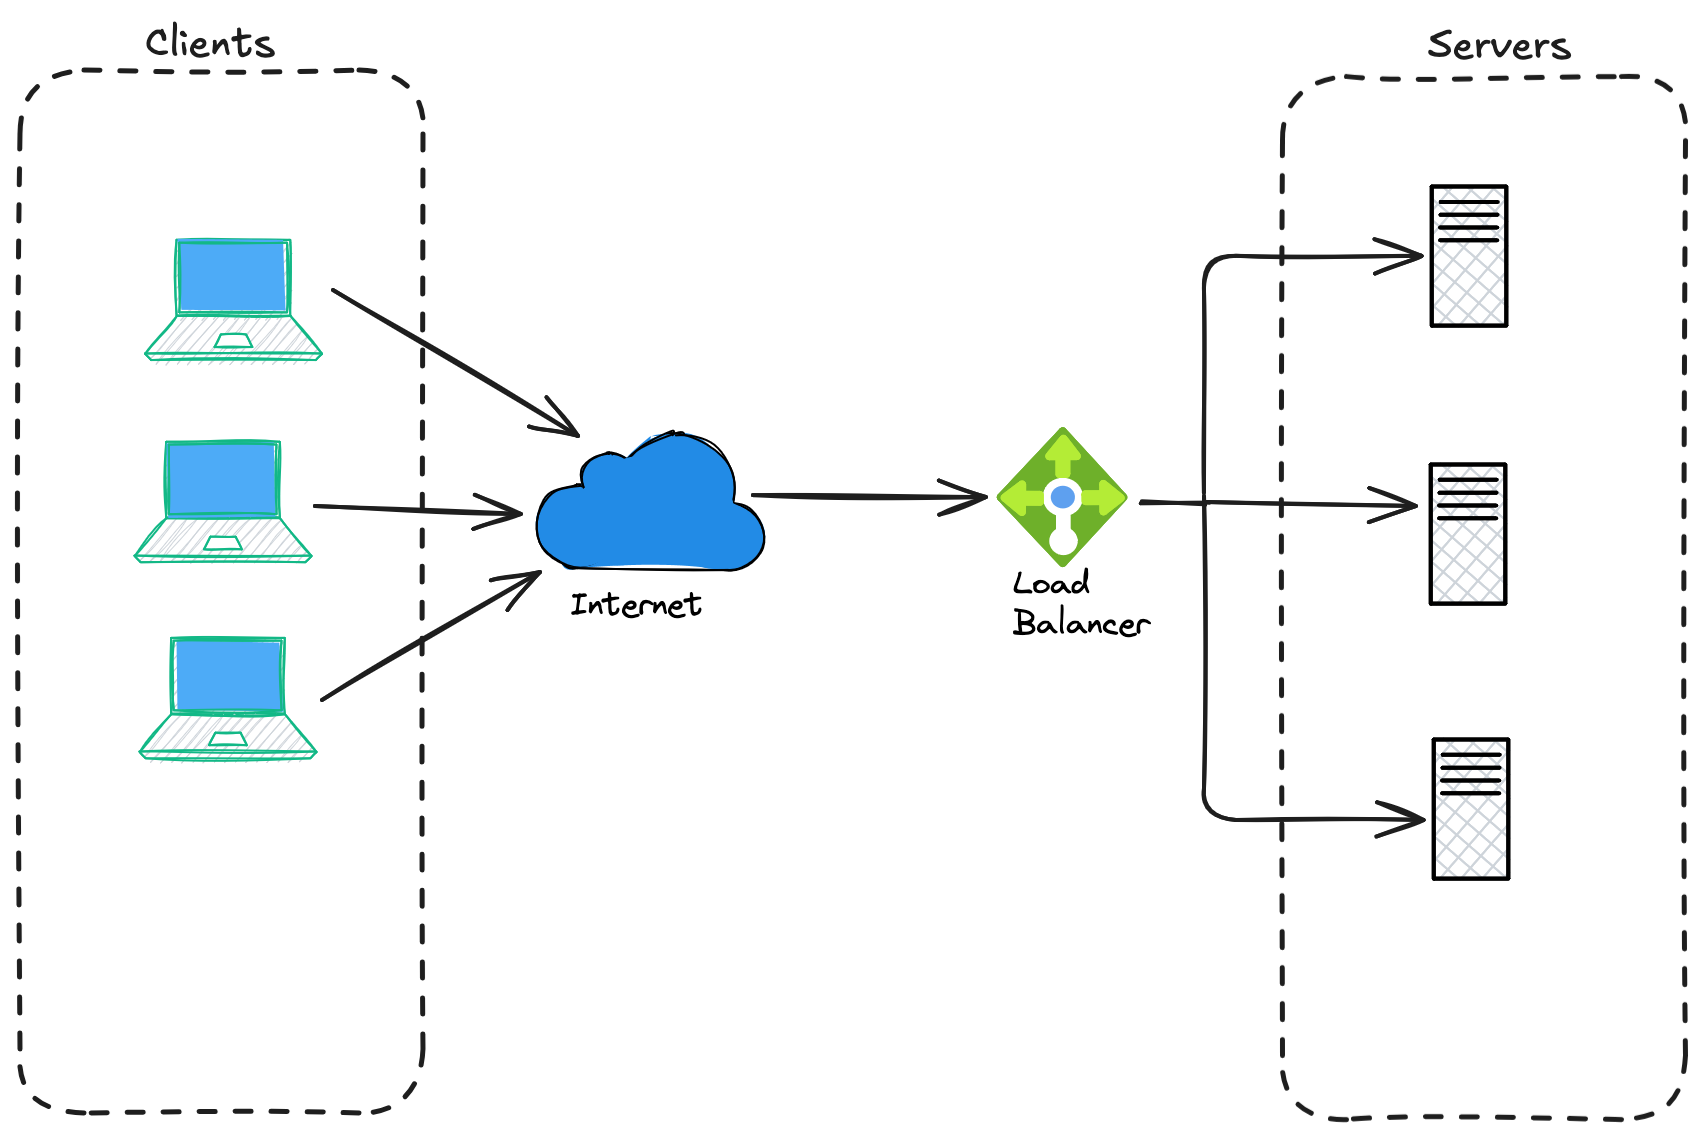
Before diving into the various Azure services, it’s worth clarifying what load balancing actually means. At its core, load balancing is about distributing incoming network traffic across multiple resources to ensure reliability, performance, and scalability.
Imagine you're at a busy coffee shop on a Monday morning. There's a single barista trying to take orders, make drinks, and handle payments — the line moves slowly, and customers start getting frustrated. Now imagine there are four baristas, each handling specific tasks or splitting the workload evenly. Suddenly, everything flows faster, orders are processed smoothly, and customers leave happy.
That’s the essence of load balancing: efficiently distributing work across multiple servers (or people) to improve speed, reliability, and user experience.
It's important to note that load balancer can be either hardware or software-based. In. context of cloud services it is mostly the software-based one.
Static vs dynamic load balancing?
Which server should handle each request load balancers are determining based on number of different algorithms. These fall into two categories:
- static
- dynamic
Static load balancing algorithms do not take into account current state of the work when distributing workload. It will not determine which servers are not utilised enough and which are overused. Typical static load balancing algorithms include round robin, least connections, IP hash, fixed partitioning etc. ****
Static load balancing is used in scenarios where traffic patterns are predictable and backend servers are homogenous and have similar capacity.
Dynamic load balancing is also a process of distributing traffic or workload across multiple servers but at runtime, and based on real-time information about server health, resource utilisation or connections count. ****
When a server becomes overloaded or fails, traffic can be automatically/dynamically rerouted to healthy instances.
So, unlike static load balancing, dynamic methods react to changing conditions in the system. (CPU usage, memory, network throughput..)
Dynamic load balancing is typically integrated with health probes so that traffic is not sent to degraded or unavailable nodes.
Due to continuous monitoring it may introduce latency and it's typically more complex than static load balancing.
In cloud environments like Azure, load balancing plays a critical role in ensuring that your applications stay responsive and available — especially under heavy traffic. But here’s where it gets tricky: Azure offers multiple load balancing services that, at first glance, seem to do the same thing. With names like Azure Load Balancer, Application Gateway, Front Door, and Traffic Manager, it’s easy to get them mixed up.
Lab 1: Azure Load Balancer
Azure Load Balancer operates at OSI Layer 4 (TCP/UDP) and distributes inbound traffic across multiple backend instances (like VMs) within a region. It provides high throughput and is ideal for network-level load balancing of VMs or container instances. In this lab, we’ll create a public Load Balancer to distribute HTTP traffic between two web server VMs.
- First we will create a resource group for our little setup. (I will use ‘eastus’ for $LOCATION here). You can define following variables before start since we will be referencing these through the setup.
# Variables (replace values as needed)
RESOURCE_GROUP="az-load-balancer-lab"
LOCATION="eastus"
LB_NAME="MainLoadBalancer"
PUBIP_NAME="LBPublicIP"
BACKEND_POOL_NAME="MyBackendPool"
az group create --location $LOCATION --resource-group $RESOURCE_GROUP- Then we create a virtual network and a corresponding subnet.
az network vnet create -g $RESOURCE_GROUP -n MyVnet --subnet-name MySubnet- Now, you can use existing VMs or create a new ones. For the purpose of the exercise we will create 2 new Linux VMs (Ubuntu 24.04), without public IPs (because Load Balancer will provide one). We will generate ssh keys for each and install nginx. Finally we well create simple entry in /var/www/html/index.html echoing hostname, so we can observe which VM is responding to client request once we finish setting up everything.
So to create VM1 issue command:
az vm create -g $RESOURCE_GROUP -n VM1 --image Ubuntu2404 --vnet-name MyVNet --subnet MySubnet --public-ip-address "" --generate-ssh-keys --size Standard_B1sNote: size argument is optional, if not supplied it will default to Standard_DS1_v2. I think Standard_B1s will suffice for our exercise. You can get list of all size with following command:
az vm list-sizes --location eastus --output tableWe can proceed and create VM2 with same configuration:
az vm create -g $RESOURCE_GROUP -n VM2 --image Ubuntu2404 --vnet-name MyVNet --subnet MySubnet --public-ip-address "" --generate-ssh-keys --size Standard_B1sNow we will crate a sample entry files in /var/www/html/index.html on each machine so we can see which machine is responding to the call.
But since these VMs do not have a public IPs, we will use command:
az vm run-command invoketo remotely execute a script or command on Azure VM without needing to manually connect to it via SSH or RDP. This uses Azure VM Agent, which is a small service automatically isntalled on most Azure images to run these commands inside VM.
For VM1:
az vm run-command invoke \
  --resource-group $RESOURCE_GROUP \
  --name VM1 \
  --command-id RunShellScript \
  --scripts '
sudo apt update && sudo apt install -y nginx;
echo "Hello from - $(hostname)" | sudo tee /var/www/html/index.html
'
The command will install nginx and create the desired index.html with hostname of machine.
Do the same for VM2:
az vm run-command invoke \
--resource-group az-load-balancer-lab \
--name VM2 \
--command-id RunShellScript \
--scripts '
sudo apt update && sudo apt install -y nginx;
echo "Hello from - $(hostname)" | sudo tee /var/www/html/index.html- Now, we want to open port 80 on both VMs Network Security Group so that load balancer can reach the web service.
az vm open-port -g $RESOURCE_GROUP -n VM1 --port 80 --priority 1001
az vm open-port -g $RESOURCE_GROUP -n VM2 --port 80 --priority 1001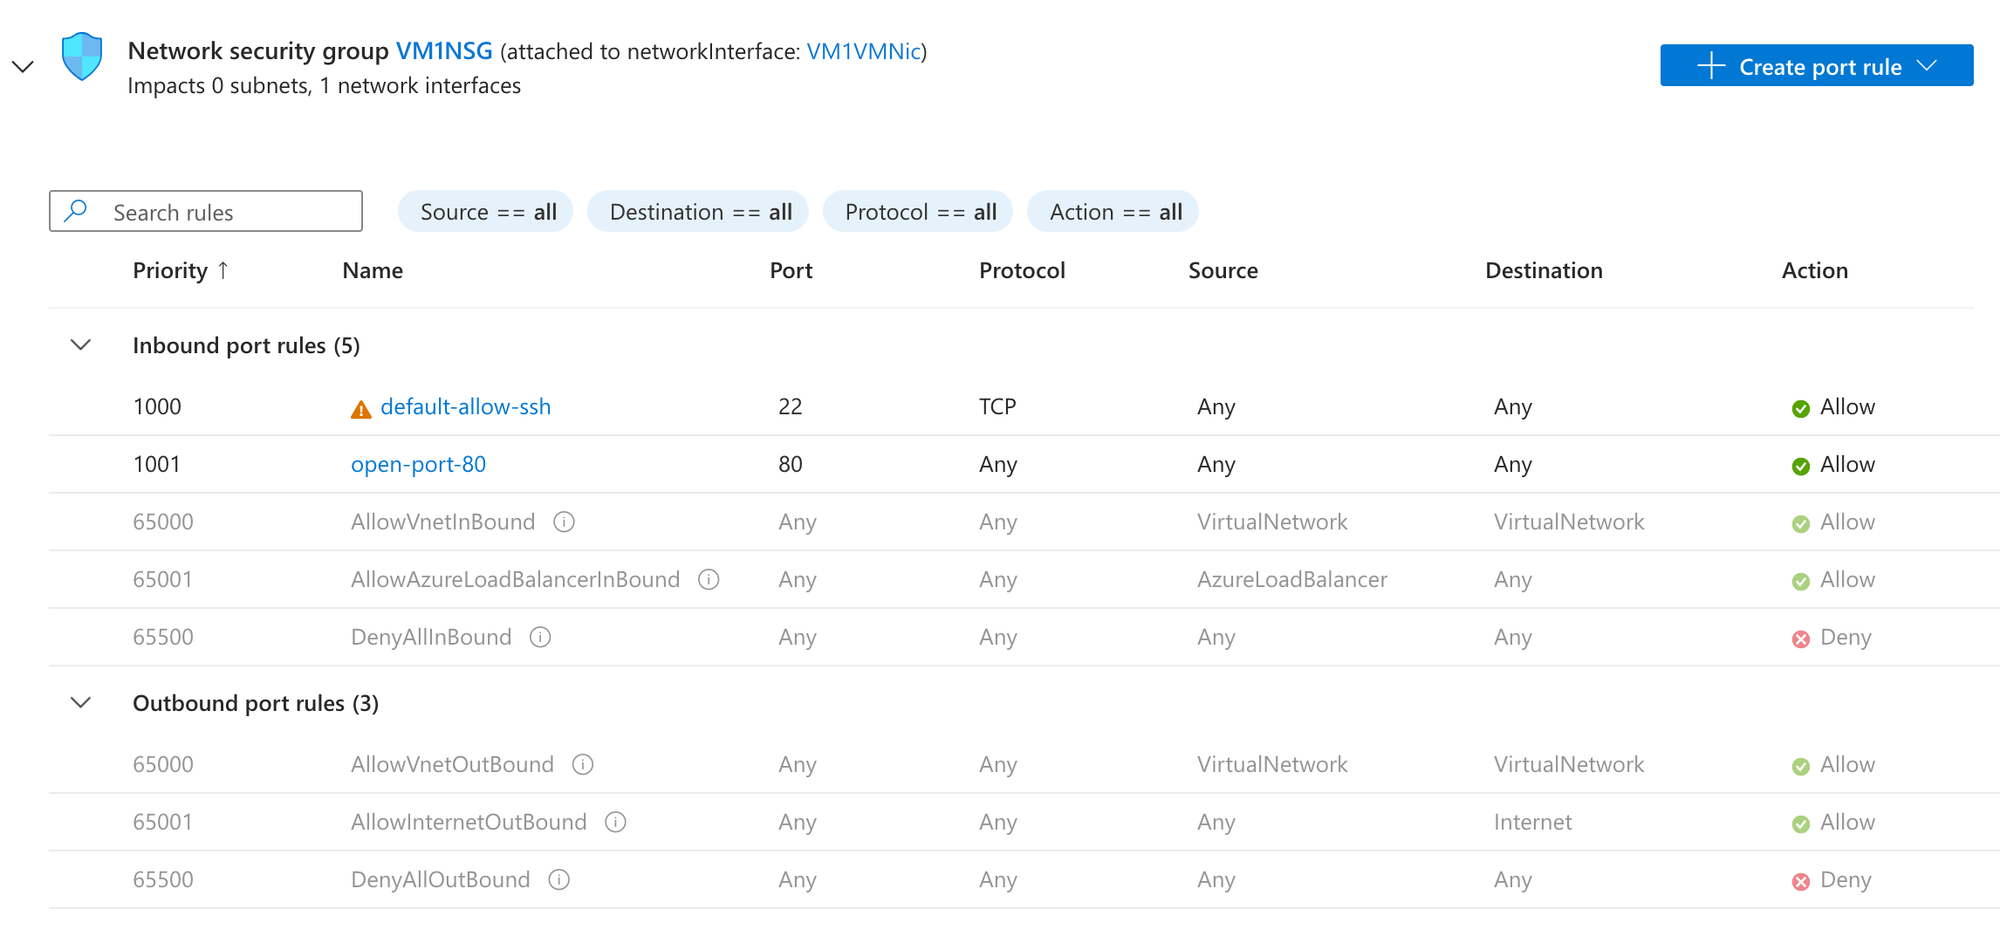
- And create a public IP for the load balancer
az network public-ip create -g $RESOURCE_GROUP -n $PUBIP_NAME --sku Standard- In this step we will create actual load balancer with one frontend and one backend pool.
az network lb create -g $RESOURCE_GROUP -n $LB_NAME --sku Standard \
    --frontend-ip-name FrontEndConfig --public-ip-address $PUBIP_NAME \
--backend-pool-name $BACKEND_POOL_NAME- Next, we want to create a health probe on port 80 (TCP).
A health probe is used to determine the health status of the instances in the back-end pool. This health probe determines if an instance is healthy and can receive traffic.
az network lb probe create --resource-group $RESOURCE_GROUP --lb-name $LB_NAME --name MyProbe --protocol http --port 80 --path /- Create a load balancing rule for HTTP (port 80)
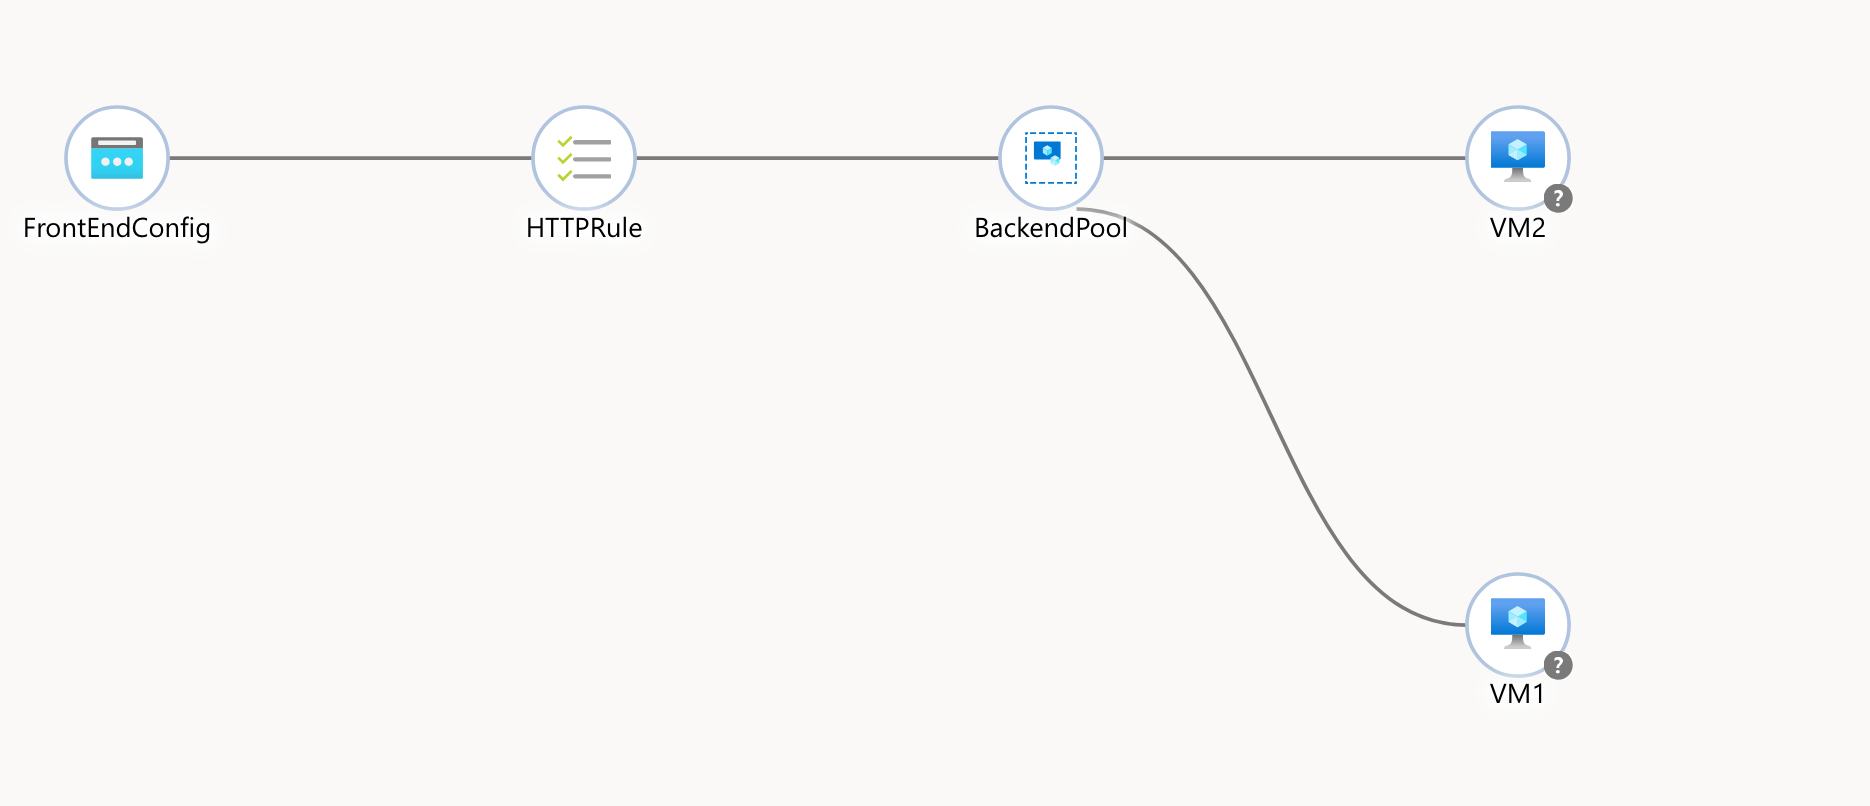
az network lb rule create -g $RESOURCE_GROUP --lb-name $LB_NAME -n HTTPRule \
    --protocol tcp --frontend-port 80 --backend-port 80 \
    --frontend-ip-name FrontEndConfig --backend-pool-name $BACKEND_POOL_NAME \
    --probe-name HealthProbe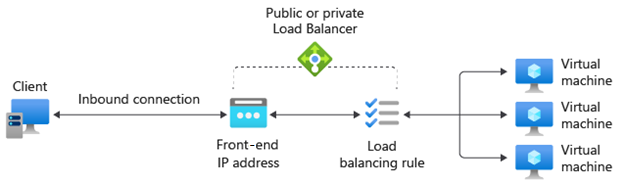
9. Add VM NICs to the Load Balancer’s backend pool
NIC1=$(az vm show -g $RESOURCE_GROUP -n VM1 --query "networkProfile.networkInterfaces[0].id" -o tsv)
NIC2=$(az vm show -g $RESOURCE_GROUP -n VM2 --query "networkProfile.networkInterfaces[0].id" -o tsv)
az network nic ip-config address-pool add -g $RESOURCE_GROUP --lb-name $LB_NAME \
    --address-pool $BACKEND_POOL_NAME --nic-name $(basename $NIC1) --ip-config-name $(az network nic show -g $RESOURCE_GROUP --name $(basename $NIC1) --query "ipConfigurations[0].name" -o tsv)
az network nic ip-config address-pool add -g $RESOURCE_GROUP --lb-name $LB_NAME \
    --address-pool $BACKEND_POOL_NAME --nic-name $(basename $NIC2) --ip-config-name $(az network nic show -g $RESOURCE_GROUP --name $(basename $NIC2) --query "ipConfigurations[0].name" -o tsv)
- And finally get the public IP of the Load Balancer
az network public-ip show -g $RESOURCE_GROUP -n $PUBIP_NAME --query "ipAddress" -o tsvAfter running the above, navigate to the displayed IP address in a browser. You should hit one of two VMs via the Load Balancer’s IP.
And that's it, you've successfully configured Level 4 Load Balancer.
Since it operates and Layer 4 (Transport Layer) Azure Load Balancer is designed to handle high-throughput scenarios efficiently - ultra-low latency and high performance (think gaming servers, financial services, or real-time applications)
You should not use Azure Load Balancer if your web app only receives a small amount of traffic and existing infrastructure already deals with the load just fine.
In one one of the following labs we will explore Azure Application Gateway, offering various Layer 7 capabilities.